 RU
RU  EN
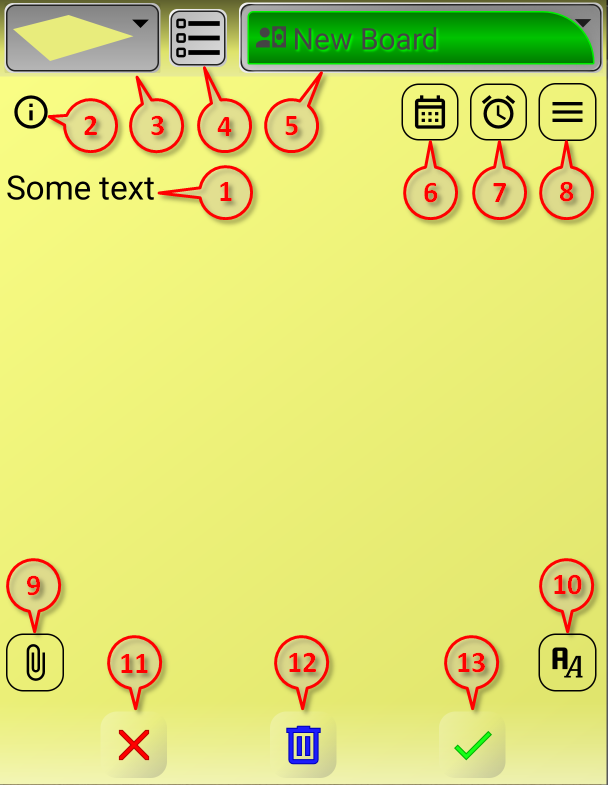
EN When you open a note or create a new one, you see a window where you can enter or edit text. But in addition to text, you also see other elements in this window that perform various functions.
When you rotate your phone screen to landscape mode, or when using a tablet or netbook with a landscape screen orientation, the note window has a slightly different appearance:
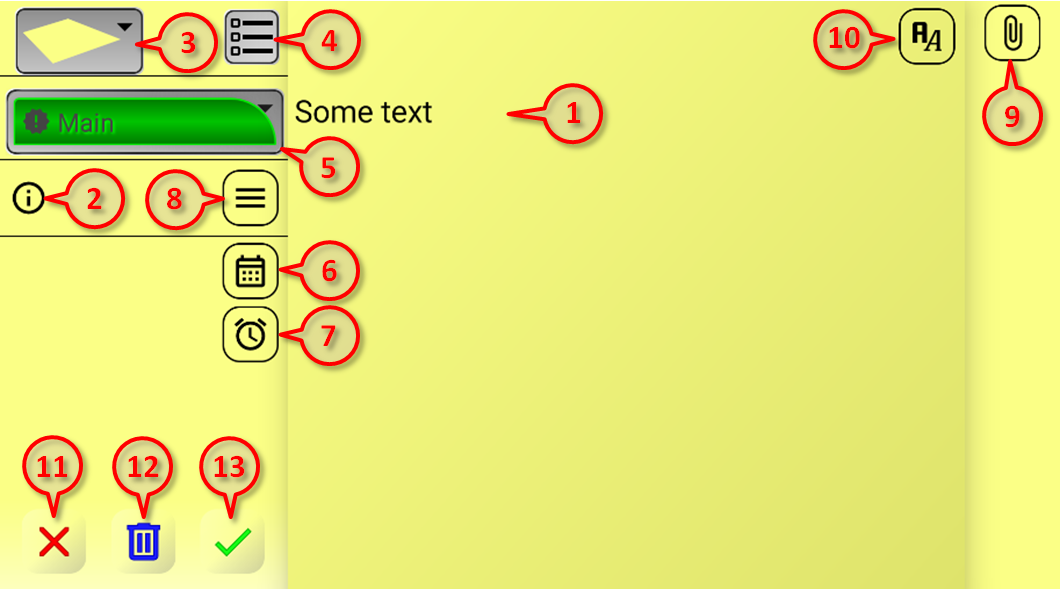
But all the elements that are present in the vertical orientation are also present in the horizontal one. Let's look at these elements in the order they are shown in the figure:
1. The main area of a note is the text input area. The text size isn't limited by the note's vertical size. As you type, the note first expands vertically, and then, when its size is limited by the screen, a scroll bar appears, allowing you to scroll up and down through long text. This allows you to store quite large texts, dozens of pages, in a note. However, I advise against getting carried away; after all, this is a note, not a text editor.
Note 1:
If a note is password-protected, an additional "Visible Text" field will appear above the main text. This field allows you to enter information that will be displayed on the sticky note on the board, while the main text remains hidden. You can read more about this in the "Notes menu" section.
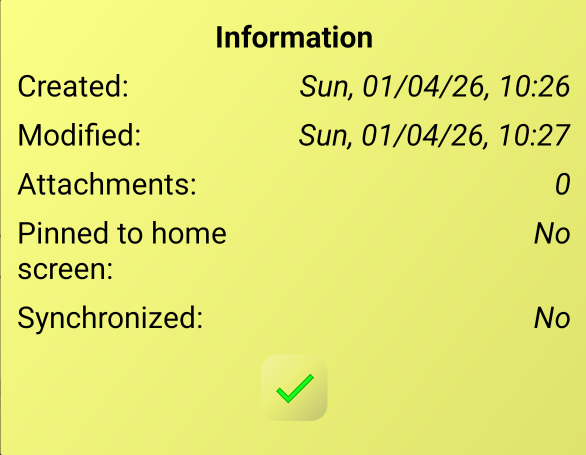
2. Clicking this button opens the "Info" window with general information about the note. This includes the creation time, the last time the note was last modified, the presence of attachments, whether the note is pinned to the home screen, and whether it syncs with Google Drive. You can read more about these parameters in the relevant sections of this Documentation. Each time you edit, a new date and time of changes is set. On the screen, it looks like this:
3. This is the note color picker. When you click on it, a drop-down list with 10 possible colors will appear.
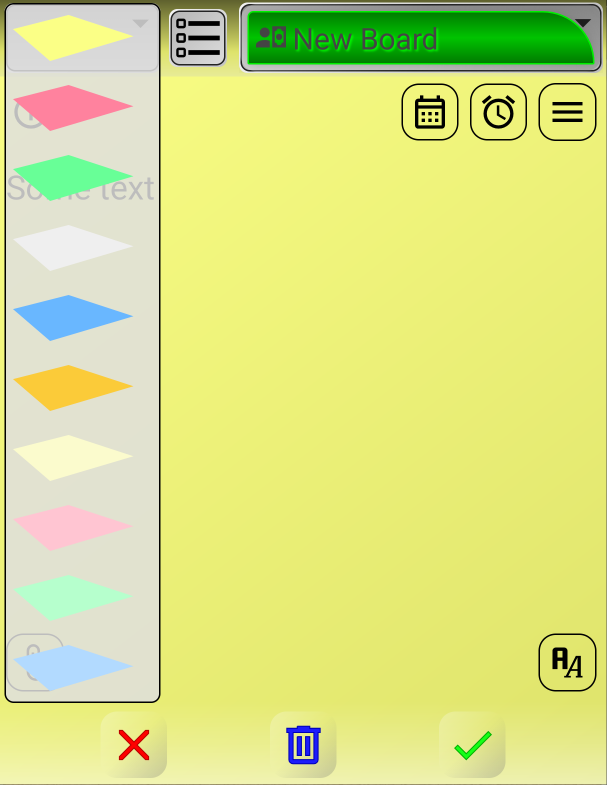
Initially, you will see the colors that are set by default. You can change this color set in the "Settings" section of the "Note Settings" section. The note's background changes when you select the desired color. When you save a note, its color is remembered and the next new note you create will be the same color, but you can always change it in the same way.
4. This is the note mode switch. A note can be in two modes: plain text and checklist. Clicking this button in a text note converts it to a checklist. You can read more about this in the "Working with checklist" section. When you click this button on a checklist, it will be converted into a regular text note. A warning will appear asking you to confirm this action. The point is that when converting a list to text, information about the status of list items will be lost.
5. Here you can see the name of the board on which this note is posted. If you click on this name, you'll see a drop-down list of all boards.
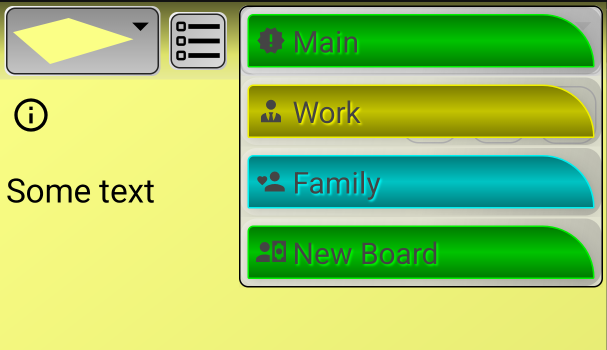
You can select any board from the list other than the one you had previously, and this note will move to the selected board. This will happen after you save the note.
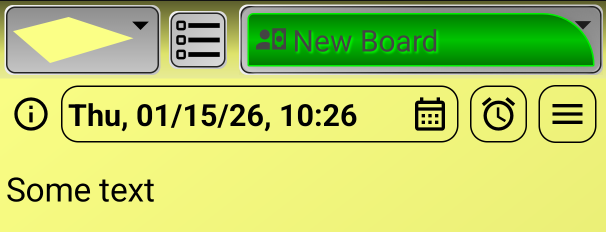
6. Button for attaching a note to the Calendar. The application has a built-in Calendar to which notes can be attached. Each note can be attached to one date. When you click this button, a calendar window will appear for selecting the date and time.
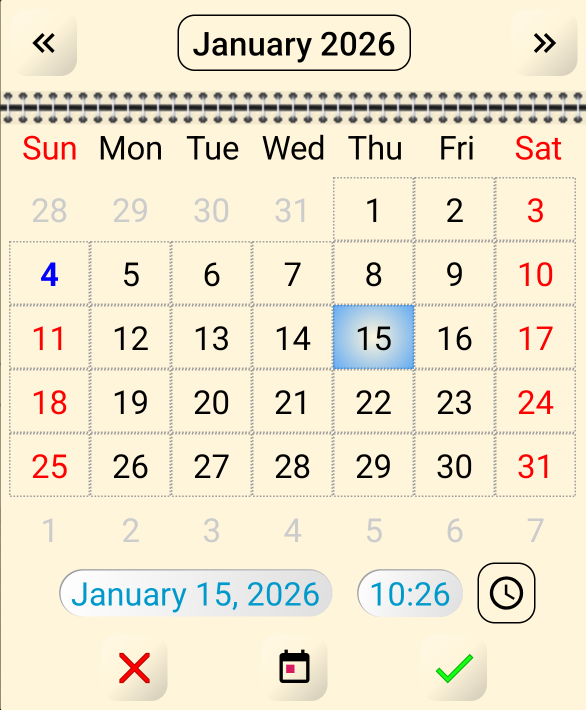
Select the desired date and click the green checkmark to link the note to that date. If necessary, you can press the button with the clock image and set not only the date, but also the time. You can read more about working with the Calendar in the "Calendar" section. If a note is linked to Calendar, the button becomes larger and displays the date and time to which the note is linked.
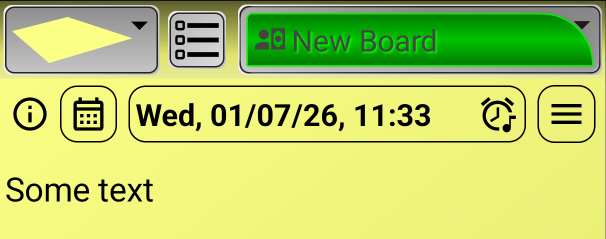
7. The next button allows you to set a reminder for the note. If a reminder is set, you will receive a notification and/or alarm at a specific date and time. You can read more about setting reminders in the "Reminders" section. If a reminder is set for a note, the button becomes larger and displays the reminder's date and time.
8. This button opens the note menu, where you can find various useful functions. You can find detailed information on all these functions in the "Notes menu" section.
9. This button opens a menu that allows you to add various attachments to your note. You can attach any number of images, videos, audio, and any files available on your phone to a note. Additionally, you can attach location (map coordinates) and contact cards from your phone's contact list as attachments. You can read more about note attachments in the "Attachments" section.
10. This button opens the Font Panel, which allows you to change the font type (bold, italic, underline, and strikethrough), as well as the font color, background, and size. Clicking this button again closes the Font Panel. You can read more about this panel in the "Working with text" section.
11. Cancel button. Clicking this button closes the note without saving any changes. This means all changes you've made to the note will be canceled, and the note will return to its original state. This applies not only to changes to the text but to everything else, too, such as adding attachments, setting reminders, and so on. If you've just created a new note, clicking this button cancels the creation of the note, and it will simply disappear. Naturally, before cancel your changes, you'll receive a warning asking you to confirm your actions:
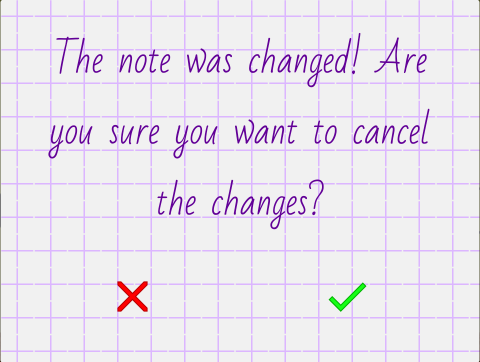
If you click the green checkmark, your changes will be canceled and the note will be closed. If you click the red cross, you'll simply return to working with the note. If you haven't made any changes to the note, but simply opened it to view information, then clicking the "Cancel" button will simply close the note without further warning.
12. The "Delete" button. Click this button if you want to delete a note. You'll see a warning asking you to confirm your action:
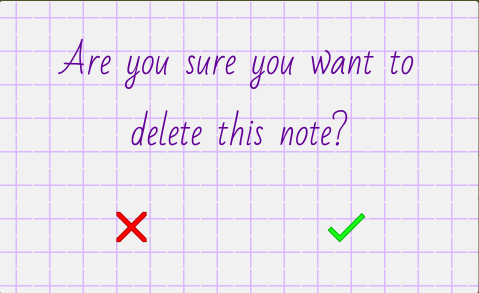
If you click the green checkmark, the note will be deleted; if you click the red cross, you will return to working with the note.
Note 2:
By default, when deleting a note, it is not immediately permanently deleted, but is moved to the "Trash" board and stored there for another 24 hours. During this time, you have the opportunity to restore the note if you deleted it by mistake. After a day, the note is deleted permanently. However, you can adjust the retention time for notes in the "Trash" board in "Settings" under "Data Storage".
13. The "Save" button. When you click this button, all changes made will be saved and the note will be closed. Remember to save the note not only after editing the text but also when making any other changes.